Tiled sprite
Tiled sprite sequence
Tile pattern
Platform builder
Tube builder
Border builder
Framed rectangle builder
Ramp builder
Additional editor tools
I have created a bunch of small editor tools with which I expect to make all the levels of the game, from now on. When I started developing Jailbroken, it was my intention to design levels based on tilemaps, grids formed by squares of equal size (16×16 pixels, to be more precise), which implies that many background, platform or wall sprites must comply with certain constraints. I thought this decision would simplify and streamline the level building process, but I was wrong. I have slowly come to realize that using tilemaps as the core of the level design, for this game, was not the best decision.
Why?
- I found myself wasting time while drawing tiles, figuring out how to split them properly when I wanted to create patterns bigger than a single tile (like ramps), or shrinking some drawings in order to make them fit into the square.
- Dealing with stacked tiles (tiles that occupy the same position, with different sorting layers) was quite annoying, especially when I realized I needed to change the layer of some specific tiles of a tilemap, as I added new stuff. Sometimes I needed to switch from one sorting layer to another repeatedly, which implied to manually look for the other tilemap in the scene, selecting it and then picking the sprite in the palette. That was far from agile so I even re-designed the Tilemap palette window to speed-up the workflow.
- Making changes to an “almost finished” level was very cumbersome (imagine you want to create a new corridor or expand an existing room), and that’s the opposite of what I was looking for. I needed tools and a methodology that allowed me to adapt the layout of the level in a fluent way.
- Filling large blocks of tiles was not as fast as it could be; after using one sprite for the background of a level, I had to pick other sprites from the palette to replace some tiles with variations here and there in order to break the monotony, it was not an automatic process. The same applies to grounds and platforms. I know I can configure “brushes” using the 2D Tilemap Extras package (automations that change which tile is drawn according to some rules), but they are too limited and there are specific cases they do not cover.
- Sometimes I needed to draw just a small number of tiles to create an isolated piece of the level. I consider using a tilemap for that to be a bit overkill.
- Regarding performance, tilemaps generate a quad per tile and that may scale fast as the size of the level grows. When creating level backgrounds, which are usually formed by one repeated sprite, having one quad per tile is a waste of memory and GPU that can be easily avoided by writing a shader and using just one SpriteRenderer.
- It was handy to generate at the same time the visual part of the walls, their colliders and their shadow casters while drawing the tilemap (although I had to code my own ShadowCaster2D generator since Unity does not provide one for Tilemaps, yet). However, it is nothing that could not be done using SpriteRenderers. Besides, I had to manually put the colliders of the platforms anyway so losing that would not mean much.
All these reasons motivated that I invested time in designing and coding a set of small and independent in-editor tools, usable by any 2D game project, that would make my level design experience more satisfying or, at least, less tiresome. And I think I achieved the goal.
Below I briefly present all the tools. I have spent a lot of hours thinking about how to make them as intuitive, comfortable to use, lightweight, optimal and versatile as possible, trying to cover all the typical use cases that one encounters while building a level.
Tiled sprite
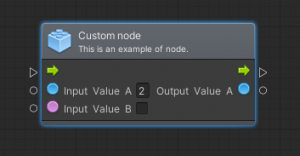
Its purpose is to cover rectangular surfaces repeating one sprite from a spritesheet. This is different from the Tiled draw mode of a SpriteRenderer since the new tool uses only one quad in total instead of a quad per repetition. Additionally, it allows adding a random color variation to make it look more appealing and provides very useful grid snapping features.
Tiled sprite sequence
A variant of the tiled sprite that allows using a list or sequence of sprites in an arbitrary order that repeats infinitely. I can form the sequence either by adding sprites one by one or by choosing them randomly using a “weight” for every sprite in the spritesheet. Alternatively, I can use a grey-scale texture or “noise” texture so the sprite drawn in every position depends on its order in the sequence and the value of the texel in the texture (this makes the mosaic look more “organic”).
Tile pattern
A variant of the tiled sprite that lets me form a rectangular pattern with M columns and N rows, which repeats infinitely.
Platform builder
Its purpose is crafting horizontal lines formed by sprites of different sizes, with left and right endpoints (optionally). All sprites are randomly chosen from lists that I have previously made. The probabilities for each sprite to appear can be tweaked and it can prevent the same sprite from appearing twice in a row. With an extra component, it can also generate a collider for the platform that adapts to its length automatically.
Tube builder
It produces horizontal and vertical lines formed by sprites of different sizes that are connected by corners (other sprites). All sprites are randomly chosen from lists that I have previously made. As you drag the handles in the scene, new parts are created and the list from which it takes every sprite depends on the direction of the movement. This is ideal for crafting pipes quickly, although it could be use to draw grounds or ceilings.
Border builder
A variant from the tube builder, it assumes that the tube has 2 sides, one internal and other external, that depends on the context. It has been designed to create surfaces with horizontal an vertical segments, all seamlessly connected, in such a way that the side that faces upwards (like the ground) may also face downwards (like the ceiling) eventually, if the tube turns twice 90º to the left, for example. I needed this to quickly create the dark borders of a room, or to draw all the surfaces of a cave (walls, ground, ceiling) with only one “stroke”. It also makes it easy to create the effect of curved concave corners.
Framed rectangle builder
It generates a rectangle made of sprites of different sizes, surrounded by a border also made of sprites of different sizes. The sprites in the inner rectangle are randomly chosen from a list I have created previously and placed forming a mosaic (the probability of each tile can be modified). Sprites in the borders are randomly chosen from other lists and are placed in such a way that one of their sides is touching the perimeter of the inner rectangle. Every side of the frame is optional, and so is the inner rectangle. Additionally, the inner rectangle may use just one sprite, repeated throughout its area.
Ramp builder
It helps to create platforms that are not horizontal but sloping. It adds random sprites next to one of the endpoints of the “ramp” or “stairs”, in such a way that the new part is placed exactly where it should in order to continue the drawing where the previous part ended. Where the picture has both endpoints has to be manually configured before adding any new part.
Additional editor tools
Using all these tools has advantages, building levels is faster, more agile and, in some cases, more optimal in terms of performance; but it also comes with some cost. First and more obvious, sprite assets have to be manually set up in such a way that they can be read by the tools, which may consume a lot of time. Finding the desired prefab for each variant of the tools may become tedious. Apart from that, the components of the tools are useless at runtime. And finally, having an object (SpriteRenderer) per part of a builder incurs in a waste of memory and CPU at runtime.
I have solved all those issues by creating other editor tools and automations.
Level builder texture editor
Each level builder uses a group of sprites from a texture. There can be several groups of sprites for different level builders in the same texture, so each sprite needs something that lets the tools know where to put every sprite (whether the sprite belongs to a given level builder and which type of part does it represent, like a corner or a vertical tube, to store the sprite in one of the lists in the level builder). I use the name of the sprite to transmit this information. Setting the name of every sprite is cumbersome so I created an editor window that allows me to change the name of many sprites in one shot (I replicated the Sprite editor window to make it very intuitive). After names have been set, a level builder can extract all the sprites from the texture with one click. If I add new sprites to the texture in the future, I only have to press the button again.
Level builder prefab variant toolbar
In order to easily find every level builder prefab and be able to instantiate it where I need it, I have created a toolbar that automatically searches for the prefabs and shows a preview that can be dragged and dropped onto the scene, creating the instance.
Sprite renderer merger
A level builder may be formed by more than 50 parts, this is 50 child GameObjects that are there only to render quads. To save resources, I wrote a script for merging all the SpriteRenderers into just one mesh. Obviously, this is a step with no return so I execute the script when I’m done or, as I explain in the next paragraph, when pre-processing scenes. All sprites should belong to the same texture, it takes into account flipped sprite renderers and custom outlines. It uses a SortingGroup component so the mesh is properly added to the render queue. The sorting layer and the order is the same as that of the first sprite renderer.
Scene pre-processing script
I use a script that implements the IProcessSceneWithReport interface which Unity executes automatically when playing or building the scenes of the project. It finds all level builder-related components and removes them all. Then it finds all sprite renderer merger components and executes them. In the end, each level builder is a clean object without children, with only mesh-related components attached to it.
![Read more about the article Animation editor QoL improvements [Repost]](https://jailbrokengame.com/wp-content/uploads/2023/05/AnimationEventSelection-300x81.png)