
Introduction
Units
Unit class
Getter or setter unit
Event unit
Wait unit
Branch unit
Customizing how units are drawn
UnitWidget
ValueInputWidget
This post was inspired by a thread in the Unity forums: https://forum.unity.com/threads/propertydrawers-is-there-a-way-to-customize-how-fields-in-a-unit-are-drawn.1282649/#post-8178347
Introduction
If you are using Unity’s Visual Scripting tools (previously known as Bolt) you must have encountered situations where everything would be simpler if you had a custom unit (a graph node) that simply received some inputs and returned an output (like a black box), and which you could add to any graph instead of having to copy and paste a group of nodes / units that always do the same operation. I dug into the disassembled code of the Bolt libraries and learned some things about customizing units that may be useful for you.
Units
Every “node” you add to a Flow graph is called “unit” in Bolt’s terminology. Units have ports (inputs / outputs) to which you can connect other units’ ports. They can be either value ports (data, variables) or control ports (connections to other units in a sequence). The visual representation of a unit is called widget.
Unit class
All units inherit from the Unit class. It provides some default behavior that can be overridden. The most interesting methods are Instantiate and Definition. Instantiate is called when the unit is created in runtime, which occurs when the GameObject that has the FlowMachine component that references the FlowGraph asset that contains the unit is instantiated; you can write code in it to configure or execute anything that should occur only once. Definition is called in runtime or in editor every time the system needs to know the shape of the unit (its ports, for example); this method should contain the creation of all the ports of all types: ValueInput, ValueOutput, ControlInput and ControlOutput.
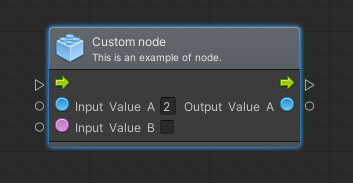
This is how a typical custom Unit looks like:
using Bolt;
using Ludiq;

[Bolt.UnitCategory("My nodes")]
[Bolt.UnitTitle("Custom node")]
[Bolt.UnitSubtitle("This is an example of node.")]
public class CustomNode : Unit
{
    [DoNotSerialize]
    public ControlInput input
    {
        get;
        private set;
    }

    [DoNotSerialize]
    public ControlOutput output
    {
        get;
        private set;
    }

    public ValueInput InputValueA
    {
        get;
        private set;
    }

    public ValueInput InputValueB
    {
        get;
        private set;
    }

    public ValueOutput OutputValueA
    {
        get;
        private set;
    }

    protected override void Definition()
    {
        // Defines all the ports
        input = ControlInput("", Enter);
        output = ControlOutput("");
        Succession(input, output); // Required

        InputValueA = ValueInput<float>("Input Value A", 2.0f);
        InputValueB = ValueInput<bool>("Input Value B", false);
        // It defines the operation that calculates the output value
        OutputValueA = ValueOutput<int>("Output Value A", (flow) => { return (int)flow.GetValue<float>(InputValueA) * 10;});
    }

    public ControlOutput Enter(Flow flow)
    {
        // Do something when the node is visited
        return output;
    }
}
Please note how we can access any input variable using the Flow instance the method receives. In case we do not have such instance, but we have a GraphReference instance, we can call the Flow.FetchValue static method to access the variables.
The Succession method must be called to connect the input flow to an output flow, otherwise the nodes connected to the ControlOutput will look grayed in the Flow Graph window.
REMEMBER: You need to build Units every time you add a new one, for it to appear in the Flow Graph window.
Unit classes can be decorated with some specific attributes:
- UnitCategory: Determines the position of the unit in the creation menu, its path.
- UnitTitle: The name of the unit as it appears in the graph.
- UnitSubtitle: A brief description of the unit as it appears in the graph.
Morphologically, I classify the different kinds of unit in a graph as “getter or setter”, “event”, “wait” and “branch”.
Getter or setter unit
A type of unit intended to perform some calculations and return the result or to change the state of an object. It inherits directly from Unit. It has one ControlInput and one ControlOutput and executes immediately. It may have zero, one or more ValueInputs as well as zero, one or more ValueOutputs. We could consider that it is a “setter” unit when it does not have an output value and it is used for changing a property of an instance, the value of a variable or sending a message; if it produces an output by performing some calculations or reading a value from a property or a variable, we could say it acts as a “getter”.
Event unit
A type of unit that executes when some conditions are met or when it is called by another component. It has one ControlOutput but no ControlInput. It may have zero, one or more ValueInputs as well as zero, one or more ValueOutputs. It inherits from MachineEventUnit<T>, where T is the type of the event arguments structure.
Example:
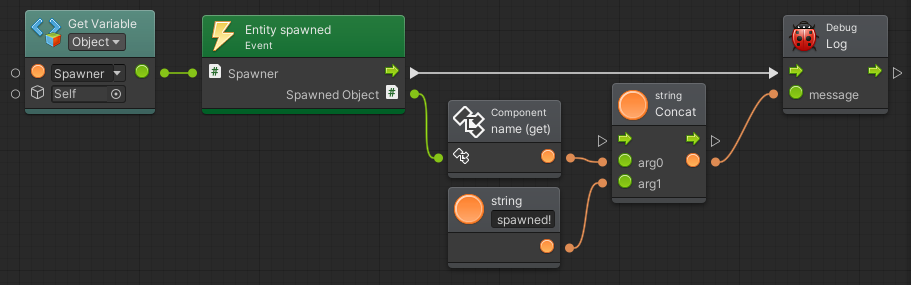
public class EntitySpawnedEventNode : MachineEventUnit<LevelEntity>
{
    public ValueInput Spawner
    {
        get;
        private set;
    }

    public ValueOutput SpawnedObject
    {
        get;
        private set;
    }

    protected override string hookName
    {
        get
        {
            return "Custom"; // Required
        }
    }

    protected override void Definition()
    {
        base.Definition();

        Spawner = ValueInput<EntitySpawner>("Spawner", null);
        SpawnedObject = ValueOutput<LevelEntity>("SpawnedObject", null);
    }

    // Called when the graph is initialized in runtime
    public override void StartListening(GraphStack stack)
    {
        base.StartListening(stack);
        GraphReference reference = stack.ToReference();
        EntitySpawner spawner = Flow.FetchValue<EntitySpawner>(Spawner, reference);
        spawner.EntitySpawned += (spawner, spawnedEntity) =>
                                        { Trigger(reference, spawnedEntity); };
    }

    // Called when the event is triggered, it receives the event arguments
    protected override void AssignArguments(Flow flow, LevelEntity args)
    {
        base.AssignArguments(flow, args);
        flow.SetValue(SpawnedObject, args);
    }

    // Called before the event is triggered
    protected override bool ShouldTrigger(Flow flow, LevelEntity args)
    {
        return true;
    }
}
Wait unit
A type of unit that suspends the sequence until a condition is met. It always has a ControlInput and a ControlOutput. It may have zero, one or more ValueInputs as well as zero, one or more ValueOutputs. It inherits from WaitUnit.
Example:
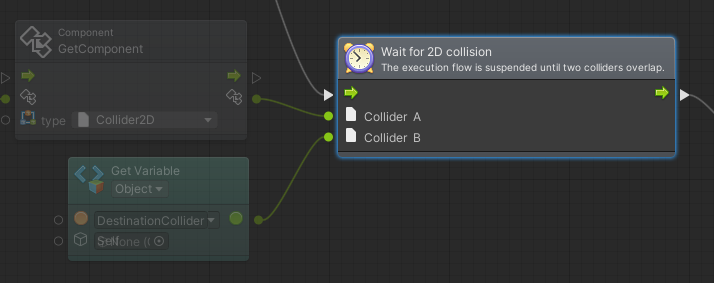
public class WaitFor2DCollisionSequenceNode : WaitUnit
{
    public ValueInput ColliderA
    {
        get;
        private set;
    }

    public ValueInput ColliderB
    {
        get;
        private set;
    }

    protected override void Definition()
    {
        base.Definition();

        ColliderA = ValueInput<Collider2D>("Collider A", null);
        ColliderB = ValueInput<Collider2D>("Collider B", null);
    }

    protected override IEnumerator Await(Flow flow)
    {
        Collider2D colliderA = flow.GetValue<Collider2D>(ColliderA);
        Collider2D colliderB = flow.GetValue<Collider2D>(ColliderB);
        ContactFilter2D filter = new ContactFilter2D();
        filter.SetLayerMask(LayerMaskExtensions.ConvertLayerIdToLayerMask(colliderB.gameObject.layer));
        filter.useTriggers = true;
        List<Collider2D> overlappedColliders = new List<Collider2D>();

        bool hasCollided = false;

        while (!hasCollided)
        {
            overlappedColliders.Clear();

            if(Physics2D.OverlapCollider(colliderA, filter, overlappedColliders) > 0)
            {
                for(int i = 0; i < overlappedColliders.Count; ++i)
                {
                    if(ReferenceEquals(overlappedColliders[i], colliderB))
                    {
                        hasCollided = true;
                        break;
                    }
                }
            }

            yield return null;
        }

        yield return exit; // When exit is returned (an inherited ControlOutput), the execution flow continues
    }
}
Branch unit
A type of unit that diverts the course of the sequence according to a condition. It has one ControlInput and one or more ControlOutputs. It has zero, one or more ValueInputs and no ValueOutputs. It inherits from Unit and implements the IBranchUnit interface.
Example:
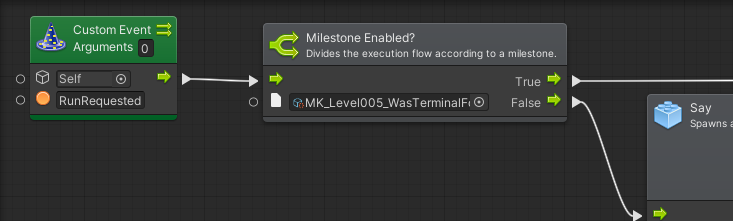
public class MilestoneBranch : Unit, IBranchUnit
{
    /// The entry point for the branch
    [DoNotSerialize]
    [PortLabelHidden]
    public ControlInput enter
    {
        get;
        private set;
    }

    /// The condition to check
    [DoNotSerialize]
    [PortLabelHidden]
    public ValueInput Milestone
    {
        get;
        private set;
    }

    /// The action to execute if the condition is true
    [DoNotSerialize]
    [PortLabel("True")]
    public ControlOutput ifTrue
    {
        get;
        private set;
    }

    /// The action to execute if the condition is false
    [DoNotSerialize]
    [PortLabel("False")]
    public ControlOutput ifFalse { get; private set; }

    protected override void Definition()
    {
        enter = ControlInput("enter", new Func<Flow, ControlOutput>(Enter));
        Milestone = ValueInput<MilestoneKey>("Milestone", null);
        ifTrue = ControlOutput("ifTrue");
        ifFalse = ControlOutput("ifFalse");
        Succession(enter, ifTrue);
        Succession(enter, ifFalse);
    }

    public ControlOutput Enter(Flow flow)
    {
        return !flow.GetValue<MilestoneKey>(Milestone).Value ? ifFalse : ifTrue;
    }
}
Customizing how Units are drawn
Sometimes we want to change how a unit looks in order to show some useful information, highlight a port, add buttons… We can modify every part of the widget that represents the unit, its header, its background, the ports, etc.
UnitWidget
We have to inherit from the UnitWidget class and use the Widget attribute, which receives the type of the unit. It provides several methods that we can override. In the example below, I added an additional text box in the header of the widget:
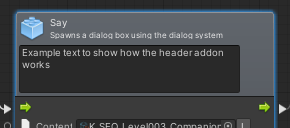
[Widget(typeof(SaySequenceNode))]
public class CustomNodeWidget : UnitWidget<SaySequenceNode>
{
    protectedoverridebool showHeaderAddon
    {
        get
        {
            return true;
        }
    }

    public CustomNodeWidget(FlowCanvas canvas, SaySequenceNode unit):base(canvas, unit)
    {
    }

    protectedoverridevoid DrawHeaderAddon()
    {
        Rect labelPosition = new Rect(iconPosition.x, headerAddonPosition.y+5, headerAddonPosition.width, headerAddonPosition.height-5);

        GUI.Label(labelPosition, "Example text to show how the header addon works", EditorStyles.textArea);
    }

    protected override float GetHeaderAddonWidth()
    {
        return position.width - iconPosition.width * 1.5f;
    }

    protected override float GetHeaderAddonHeight(float width)
    {
        return 65.0f;
    }
}
There are other methods that are executed in the base class:
public override void DrawForeground()
{
    // Extracted from assembly
    this.BeginDim();
    base.DrawForeground();
    this.DrawIcon();
    if (this.showSurtitle)
        this.DrawSurtitle();
    if (this.showTitle)
        this.DrawTitle();
    if (this.showSubtitle)
        this.DrawSubtitle();
    if (this.showIcons)
        this.DrawIcons();
    if (this.showSettings)
        this.DrawSettings(); // This cannot be overriden
    if (this.showHeaderAddon)
        this.DrawHeaderAddon();
    if (this.showPorts)
        this.DrawPortsBackground();
    this.EndDim();
}
ValueInputWidget
In order to customize how ValueInput ports are drawn, we have to inherit from the ValueInputWidget class. Note that, since the ValueInput class is sealed, we can not use a derived type as argument of the Widget attribute; instead, we have to use the same type for all the ValueInputs and draw them differently depending on the type of the value stored in the port.
In the following example, I added a button to any ValueInput that stores a LocalizationKey:
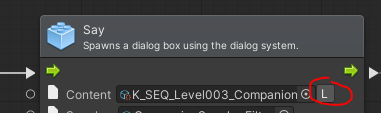
[Widget(typeof(ValueInput))]
public class CustomValueInput : ValueInputWidget
{
    public CustomValueInput(FlowCanvas canvas, ValueInput port) : base(canvas, port)
    {
    }

    public override void DrawForeground()
    {
        if(port.type == typeof(LocalizationKey))
        {
            base.DrawForeground();
            Rect localizationButton = new Rect(position.position + new Vector2(position.width, 0.0f), new Vector2(position.height, position.height));

            if(GUI.Button(localizationButton, "L"))
            {
            }
        }
        else
        {
            base.DrawForeground();
        }
    }
}
I hope all this information is useful for you to create better tools for your game designers or for yourself. Please share it with other developers!
![Read more about the article Winter update! [Repost from Patreon]](https://jailbrokengame.com/wp-content/uploads/2024/05/PatreonPost.png)
![Read more about the article Constrained Delaunay Triangulation [Repost]](https://jailbrokengame.com/wp-content/uploads/2023/03/Quadrilaterals-300x258.png)